

Accessories for Tires and Wheels
You might already know that Coker Tire Company is the world's leading supplier of collector and wheels, but don't overlook our huge selection of accessories for collector tires and wheels. Shop thousands of hard-to-find valve stem accessories, caps, trim rings and so much more. We offer many authentic and application specific tires and wheels, accessories and unique gifts for collectors, restorers and enthusiasts.
-
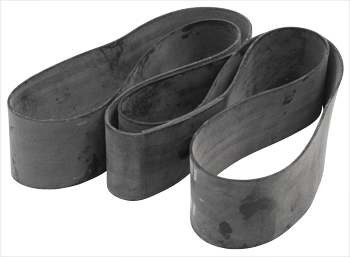 15 Inch Rim Strip$3.00


Accessories for Tires and Wheels
Frequently Asked Questions
Identity & Purpose ▼
What role do center caps play in tire and wheel accessories for classic cars? ▼
Center caps are a key part of tire and wheel accessories because they cover the hub area and complete the wheel’s visual profile. Many caps listed, such as Ford, Chevrolet, and Mercury styles, are designed with specific back I.D. measurements like 7.0 inch or 8.25 inch to match factory wheels or reproduction steel wheels.
Beyond appearance, center caps help keep debris and moisture away from hub components, reducing corrosion risk over time. Properly fitted caps with secure snap-on fitment and retention clips also prevent loosening at highway speeds. Choosing the correct diameter and retention style is essential to avoid rattling, poor fitment, or damage to painted wheel surfaces.
What types of tire and wheel accessories are available for vintage and collector vehicles? ▼
This tire and wheel accessories category includes OE-style center caps, hot rod wire caps, derby caps, and valve stem accessories. Many options are application-specific, referencing vehicles like 1940 Ford or 1950 Mercury, while others are more universal for smoothie or steel wheels.
Each type serves a different purpose. OE-style caps focus on restoration accuracy, while baby moon or wire caps emphasize custom styling. The variety of back I.D. sizes ensures compatibility across multiple wheel diameters. Understanding these categories helps buyers choose accessories that align with both their vehicle’s era and their intended aesthetic.
What should first-time buyers know before choosing tire and wheel accessories? ▼
First-time buyers should focus on three basics: wheel diameter, back I.D. measurement, and mounting method. Accessories like center caps rely on precise sizing to ensure proper snap-on fitment and secure retention without damaging the wheel surface.
It is also important to consider real-world conditions. Accessories must withstand vibration, moisture, and road debris. Poor fitment can lead to rattling or loss at speed, while improper installation may scratch finishes. Taking time to match specifications and understand compatibility avoids common mistakes and ensures long-term satisfaction.
Appearance & Styling ▼
How does chrome plating compare to painted or stainless finishes in tire and wheel accessories? ▼
Chrome plating offers a bright, reflective finish that enhances visual impact, especially on show cars or custom builds. However, chrome can be more susceptible to pitting if exposed to moisture without proper care.
Stainless steel provides excellent corrosion resistance and durability while maintaining a polished appearance. Painted finishes are often used in OE-style applications for authenticity but may be more prone to scratching. The choice depends on how the vehicle is used and how much maintenance the owner is willing to perform.
How do branded center caps influence the authenticity of a classic car build? ▼
Branded center caps featuring logos like Ford or Chevrolet help reinforce the vehicle’s identity and historical accuracy. These details are often critical in concours-level restorations where originality is judged closely.
Using the correct size and design ensures that the cap sits properly within the wheel, maintaining the intended proportions. Incorrect branding or sizing can stand out visually and detract from the overall presentation. Authentic caps also tend to follow original mounting methods, improving both fit and appearance.
What finish considerations matter most for regularly driven classic cars using tire and wheel accessories? ▼
For regularly driven vehicles, durability and ease of maintenance are key. Stainless steel finishes offer strong resistance to corrosion and are easier to clean without damaging the surface.
Chrome finishes require more care to prevent pitting and maintain shine. Painted surfaces can chip during installation or removal if tools are not used carefully. Choosing a finish that balances appearance with real-world usability helps reduce long-term maintenance challenges.
Fitment & Compatibility ▼
How do I choose the correct size tire and wheel accessories based on back I.D. measurements? ▼
Back I.D. measurement is critical for selecting the correct accessory size. It refers to the inside diameter of the cap where it mounts to the wheel. Listings such as 7.0 inch or 8.25 inch indicate the exact fitment requirement.
Accurate measurement ensures proper snap-on fitment and secure retention. If the size is too small, installation may damage the cap or wheel. If too large, the cap may not stay in place, leading to rattling or loss during driving. Always match the accessory size to the wheel’s mounting diameter.
What mounting methods are used in tire and wheel accessories and how do they affect fitment? ▼
Most center caps use a snap-on fitment with retention clips that grip the wheel’s mounting surface. This design allows for easy installation and removal without additional hardware.
The effectiveness of this method depends on the condition of the wheel and the precision of the accessory. Worn or bent wheel edges can reduce retention strength, increasing the risk of caps coming loose. Ensuring proper alignment during installation helps maintain a secure fit.
Are tire and wheel accessories interchangeable across different vehicle brands? ▼
Some accessories are interchangeable if the size and mounting method match, but many are designed for specific brands or models. OE-style caps often include branding and dimensions unique to a particular vehicle.
Using a mismatched accessory may result in poor fitment or incorrect appearance. While custom caps offer more flexibility, ensuring compatibility with the wheel’s dimensions remains essential to avoid installation issues and maintain a secure fit.
How do older wheel tolerances affect tire and wheel accessory fitment? ▼
Older wheels can have slight variations due to wear, manufacturing differences, or previous repairs. These variations can affect how tightly an accessory fits.
A cap that fits well on one wheel may feel loose or tight on another. Checking each wheel individually and adjusting installation technique helps ensure consistent fitment. In some cases, worn edges may reduce retention strength, increasing the likelihood of movement or noise.
Materials, Quality & Construction ▼
What materials are commonly used in tire and wheel accessories and how do they perform? ▼
Common materials include stainless steel, chrome-plated steel, and painted metal. Stainless steel offers strong corrosion resistance and durability, making it suitable for regular driving conditions.
Chrome-plated options provide a bright finish but require more maintenance to prevent pitting. Painted accessories are often used for authenticity but may be more susceptible to wear. Choosing the right material depends on how the vehicle is used and the desired balance between appearance and durability.
How does stainless steel construction benefit tire and wheel accessories? ▼
Stainless steel construction provides excellent resistance to rust and environmental damage. This makes it a practical choice for vehicles exposed to moisture or varying weather conditions.
It also maintains its finish over time with minimal maintenance. Unlike chrome plating, stainless steel is less likely to chip or peel. This durability makes it a preferred option for drivers who prioritize longevity and ease of care.
What cleaning and maintenance practices are recommended for tire and wheel accessories? ▼
Regular cleaning with non-abrasive products helps maintain the finish and prevent buildup of dirt and moisture. Avoid harsh chemicals that can damage chrome or painted surfaces.
Drying accessories after cleaning reduces corrosion risk. Careful handling during removal prevents scratching or chipping. Consistent maintenance ensures that accessories retain both their appearance and functionality over time.
Installation and Guidance ▼
How do I install tire and wheel accessories with snap-on fitment correctly? ▼
Snap-on accessories are installed by aligning the cap with the wheel’s mounting surface and applying even pressure until it seats securely. Ensuring proper alignment prevents damage to retention clips.
Using gentle, consistent force helps avoid bending or scratching the finish. It is important to check that the cap sits flush and does not move. Proper installation ensures secure retention and reduces the risk of loss driving.
What tools are recommended for installing tire and wheel accessories without damaging the finish? ▼
Soft tools such as rubber mallets or padded gloves are recommended to avoid scratching chrome or painted surfaces. Avoid using metal tools directly on the accessory.
Protective materials can be placed between the tool and the accessory during installation. Taking these precautions helps preserve the finish and prevents visible damage that can affect the overall appearance.
How do I safely remove tire and wheel accessories without scratching the wheel? ▼
Removal should be done carefully using a non-metal pry tool or a protected edge. Applying even pressure around the cap helps release it without bending.
Avoid forcing the accessory, as this can damage both the cap and the wheel’s paint. Taking time to remove it properly prevents scratches and maintains the integrity of the mounting surface.
What should I check after installing tire and wheel accessories? ▼
After installation, check that the accessory sits flush and does not wobble. Inspect the retention clips to ensure they are properly engaged.
It is also important to verify clearance with surrounding components. Taking a short test drive and rechecking the fit helps confirm that the accessory is secure and functioning as intended.